



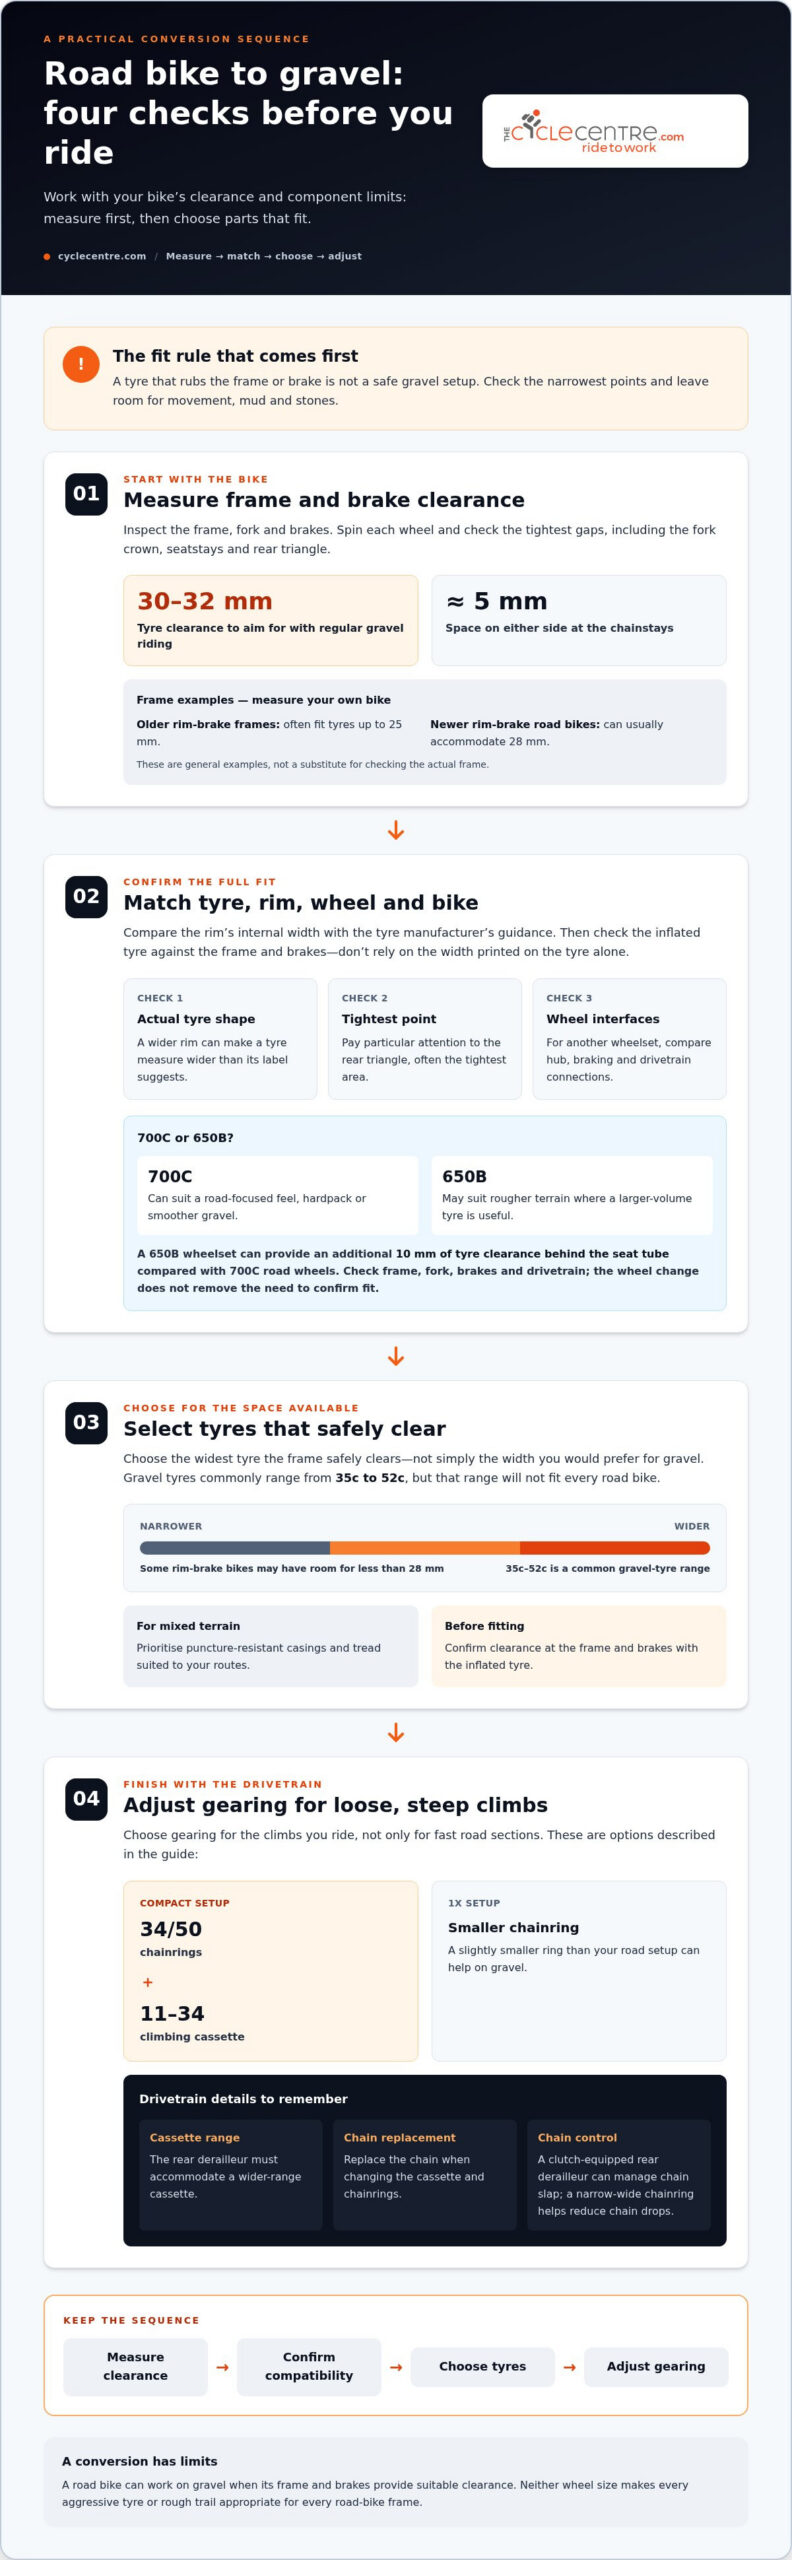
A road bike can handle gravel, but only if its frame and brakes leave room for suitable tyres. For converting a road bike to a gravel bike, aim for clearance for tyres at least 30-32 mm wide, with about 5 mm of space on either side at the chainstays. Tyre fit is the key limit: a wider tyre that rubs the frame or brake won’t make a stable setup.
If you’re hoping to make rougher lanes feel more comfortable and controlled, you’re right to look beyond the tyres alone. This guide explains how to assess clearance, choose between 700C and 650B wheels, adjust your cockpit and consider tubeless tyres. It also covers gearing and the point where a road bike’s design sets a limit, so you can make practical changes without expecting it to behave exactly like a gravel bike.
Key Takeaways
- Measure frame and brake clearance before choosing tyres; a tight fit can rub once the wheels are moving.
- Compare 700C and 650B wheel options to see which suits your frame and the terrain you ride.
- Consider a flared handlebar and a cockpit setup that gives you steadier control on loose surfaces.
- Learn how tubeless tyres, lower pressure and sealant can help improve comfort and manage punctures.
- Understand where a road bike works well on gravel and which design limits a conversion can’t overcome.
Can you turn a road bike into a gravel bike?
Yes, if the frame and brakes provide clearance for suitable tyres. Start by assessing fit, then choose components around your bike’s limits.
-
Assess frame suitability and tyre clearance
Inspect the frame, fork and brakes before buying parts. For regular gravel riding, aim for clearance for tyres at least 30-32 mm wide. Leave about 5 mm on either side at the chainstays, and keep a small gap wherever the tyre passes the frame or brake.
Spin each wheel and check the narrowest points, including the fork crown and seatstays. Mud, stones and wheel movement can turn a close fit into rubbing. Older rim-brake frames often fit tyres up to 25 mm, whilst newer rim-brake road bikes can usually accommodate 28 mm. Treat those as general examples, not a substitute for measuring your frame.
-
Check tyre and rim compatibility
Measure the space around each wheel and compare it with the tyre’s stated width. Check the frame and brake openings, paying particular attention to the rear triangle, which is often the tightest point. A wider rim can make a tyre measure wider than its label suggests, so allow for the inflated tyre’s actual shape.
To check road bike tyre and rim compatibility, compare the rim’s internal width with the tyre manufacturer’s guidance, then confirm that the inflated tyre clears the frame and brakes. Don’t rely on the number printed on the tyre alone. Conversion costs in Ireland depend on what fits and what needs replacing. Common parts include tyres, tubes or tubeless equipment, and possibly wheels or drivetrain components.
-
Choose gravel tyres for available clearance
Select the widest tyre your frame safely clears, rather than choosing a width simply because it suits gravel. Gravel tyres commonly range from 35c to 52c, but that range won’t fit every road bike. Rim-brake bikes may have room for tyres smaller than 28 mm, depending on frame and brake clearance; older examples often stop at 25 mm.
Disc-brake road bikes may offer more tyre clearance, but fit depends on the frame. A slightly older disc-brake frame may fit a 32 mm cyclocross tyre. For mixed terrain, prioritise puncture-resistant casings and a tread suited to your routes. A complete gravel bike costs more upfront than reusing compatible road-bike parts, while extensive component changes can narrow that difference.
-
Review gearing changes for gravel
Choose gearing for steep, loose climbs, not just fast road sections. A compact 34/50 chainring setup paired with an 11-34 climbing cassette is one option. A wider-range cassette can make climbs easier, but the rear derailleur must accommodate it. Replace the chain when changing the cassette and chainrings.
For a 1x setup, a slightly smaller chainring than your road setup can help on gravel. A clutch-equipped rear derailleur can manage chain slap, while a narrow-wide chainring helps reduce chain drops. Set up in order: measure clearance, confirm tyre and rim compatibility, choose tyres, then adjust gearing. A conversion may cost less when existing parts remain usable; replacing wheels and drivetrain adds to the parts list.
700C and 650B wheel sizes
Compare wheel diameter as well as tyre width, intended terrain and frame clearance. The right choice depends on whether you prioritise speed on roads or room for larger tyres on rougher trails.
-
Compare 700C and 650B wheel sizes
Start by comparing the two common gravel wheel diameters: 700C and 650B. The 650B wheel is smaller, while 700C is the familiar road-bike size for many riders. Either can be used for gravel, but the diameter affects which tyre options may suit your frame and the way the bike feels on your usual routes.
Keep your riding in mind. A 700C setup can make sense if you want to keep a road-focused feel and ride hardpack or smoother gravel. A 650B setup may suit rougher terrain where a larger-volume tyre is useful. Gravel tyres are commonly available in both diameters, so compare complete wheel-and-tyre combinations rather than choosing by wheel size alone.
If you ride both paved roads and gravel, consider keeping two wheelsets: one with road tyres and another with gravel tyres. Swapping between them lets you adapt the bike to the route without changing tyres each time. Before buying a second wheelset, compare its hub, braking and drivetrain interfaces with your existing bike. Matching those connections matters as much as selecting 700C or 650B.
-
Consider a 650B wheel conversion
Choose a 650B conversion if your disc-brake road bike needs more room for a wider tyre. The smaller wheel diameter may allow a larger tyre to fit, and a 650B wheelset can provide an additional 10 mm of tyre clearance behind the seat tube compared with 700C road wheels. This can open up options where the frame restricts tyre width with the original wheels.
A road bike can be converted to 27.5-inch (650B) wheels, but assess the whole setup before changing over. Check that the wheel fits the frame and fork, and that the brakes and drivetrain work with the replacement wheelset. Disc brakes are relevant here because a disc-brake bike can use 650B wheels; the wheel change doesn’t remove the need to check fit and operation.
Think about how the smaller diameter and chosen tyre work together on your routes. A 650B wheel with a wider gravel tyre may suit broken surfaces, while a 700C wheelset may better match faster rides on roads and hardpack. Neither option makes an aggressive tyre or a rough trail appropriate for every road-bike frame. Test the completed setup on familiar surfaces before taking it onto more demanding trails.
Flared handlebars and a shorter stem
Adjust the cockpit to improve control on loose terrain while keeping the brakes easy to reach. Choose a handlebar shape and width that suit your riding position and the bike’s geometry.
-
Choose flared drop bars or flat bars
Choose flared drop bars if you want several hand positions for longer rides, or flat bars for a straightforward, upright grip. Both can provide better control and comfort on gravel. Road handlebars commonly measure 38-44 cm wide at the hoods, so compare the new bar’s shape and width with your current setup before changing it.
Check that your brake levers and shifters are compatible with the handlebar. Drop-bar and flat-bar controls aren’t interchangeable by default. Position the levers so you can reach the brakes securely from your usual hand position.
-
Fit wider flared gravel handlebars
Try a wider flared bar if you want a more stable hand position on rough sections. Dedicated gravel drop handlebars can be wider than 50 cm and have nearly 30 degrees of flare. That extra width spreads your hands and can give you more leverage when steering across uneven ground.
Compare the handlebar width at the hoods and drops, rather than judging by overall width alone. A very wide bar can change your reach and feel awkward on narrow Irish lanes. Check that it fits your stem and that the cables have enough slack when you turn.
-
Improve braking and control
Position the levers so your hands can reach them comfortably, then practise braking from the hoods and drops. A flared drop bar or flat bar can improve control on gravel, but secure access to the brakes remains essential on loose descents.
After changing the bars, check that each lever operates its brake correctly. Test the setup at low speed on a quiet, firm surface before riding rough trails. If braking feels strained from the new hand position, adjust the lever angle or bar position before picking up speed.
- Assess the stem after fitting the bar. A shorter stem can bring the bars closer and make steering feel more manageable, but it also changes reach and handling. Make small adjustments, then check that your elbows stay relaxed and your hands aren’t crowded against the bars.
- Set up the cockpit in stages. Mark the original handlebar and lever positions before removing anything, then make one change at a time. Take a short ride on familiar terrain and assess steering, hand comfort and braking. If the bike feels twitchy or cramped, revisit the stem length and bar position before trying rougher trails.
Tubeless tyres and puncture sealant
A tubeless setup can improve grip and comfort on gravel, particularly with wider tyres. Match the system to your wheels and riding, and fit it carefully.
-
Set up tubeless tyres with sealant
Use tubeless-ready tyres and rims designed to work together. Fit the correct rim tape and tubeless valve, then add sealant according to its instructions. Before inflating, check that the tyre bead sits evenly around the rim, then inspect for leaks.
Once the tyre holds air, rotate the wheel so the sealant coats the inner casing instead of pooling in one place. Recheck the pressure before riding and look for escaping air around the valve, bead and rim bed. A poor seal can cause the tyre to lose pressure.
Keep the valve accessible when positioning the wheel, and use a pump suitable for seating the tyre. Don’t force a tyre and rim combination that won’t seat correctly. For a gravel conversion, the bead must be secure and the rim airtight before you lower the pressure or ride rough ground.
-
Use lower tubeless tyre pressures
Start at a lower pressure than you’d use in road tyres, then assess grip and comfort on a familiar gravel route. Lower pressure lets the tyre deform over rough surfaces, which can improve traction, soften corrugations and help the tyre stay in contact with uneven ground.
Make small adjustments and note how the bike behaves on firm paths and loose sections. If the tyre feels vague in corners or bottoms out over bumps, add pressure. If it skips across gravel and loses grip, reduce pressure cautiously. The right setting depends on the tyre, rim, rider and terrain, so judge how it feels rather than copying another bike’s setup.
Check the tyres before each ride. A tubeless tyre that has lost air may feel soft in turns or risk coming off the rim. Restore pressure before riding, and reassess after changing the tyre width or wheelset.
-
Address tubeless tyre puncture risk
Tubeless tyres with sealant can help manage small punctures on unpaved terrain. As the wheel turns, sealant may close some holes, reducing the chance of stopping for every thorn or sharp stone. Wider tyres on gravel can also get pinch flats, which tubeless setups can help avoid.
Sealant won’t repair every cut. Inspect the tread and sidewalls after riding, especially after crossing sharp stones or debris. If air continues to escape, stop and assess the damage rather than riding on a rapidly deflating tyre. Carry a spare tube and the tools to fit it, so a puncture the sealant can’t close doesn’t end your ride.
Before setting out, check that both tyres hold pressure and the valves are secure. A quick check after a rough section can catch a slow leak early. This routine helps you benefit from tubeless grip while staying prepared for damage the sealant can’t close.
Road bike suitability and conversion limitations
Match the bike to the gravel you plan to ride. Hardpack is a more realistic target than rough trails.
- Choose routes suited to a road bike’s design. A road bike can work well on hardpack gravel and may be faster than a gravel bike. Loose, broken trails demand more from tyre clearance, handling and braking. If your regular routes include rough sections, judge the bike by its most limiting feature rather than assuming new parts will change its design.
- Consider the road bike’s geometry before changing your riding position. Road bikes generally have a more aggressive geometry than gravel bikes, so the lower, more forward position may feel unfamiliar on rough ground. You may adapt with practice, but ride varied terrain at a controlled pace before attempting trails, and note any handling that feels uncomfortable.
- Keep the existing brake system in mind. A road bike with rim brakes may need changes to work well on gravel, where disc brakes can offer more control and stopping power on loose surfaces. However, a rim-brake road bike cannot be converted to disc brakes. If disc braking is essential for your routes, changing the brake system isn’t a practical conversion.
- Check drivetrain compatibility before fitting a wider-range cassette. Lower gearing can make steep gravel climbs easier, but the rear derailleur must accommodate the larger cassette. A cassette beyond its capacity won’t work correctly. If you change the cassette and chainrings, replace the chain at the same time. Treat compatible components as a complete setup, not as separate changes.
- Check for practical mounting points, then test the finished bike. Frame eyelets for mudguards and luggage racks can be useful on longer gravel rides. Alternative attachments may work without these mounting points, but they won’t change the frame’s clearance or handling limits. Before riding trails, test the bike on varied terrain, including firm paths and gravel, and check its braking, steering and climbing.
The main limits are the frame and brake system: a new cockpit or tyres won’t turn every road bike into a trail bike. Use a road bike for hardpack and manageable gravel. Choose a purpose-built gravel bike if your routes require clearance, braking or geometry that your frame can’t provide.
The Cycle Centre: Bike to work
If your road bike’s frame, brakes or geometry limit a conversion, The Cycle Centre’s Gravel and Adventure Bikes offer a practical alternative: bikes designed for gravel riding, rather than a road setup adapted beyond its limits.
If you’re weighing a new bike against keeping your current one, The Cycle Centre offers the Cycle to Work scheme. It can be a useful route to exploring a different bike for your regular rides, including gravel routes. Consider the terrain you ride most and the features you need before deciding whether a conversion or a dedicated gravel bike suits you better.
Contact The Cycle Centre to discuss your next step, or visit cyclecentre.com.
Choose the setup that opens up your next ride
Deciding whether converting a road bike to a gravel bike suits your riding is also a chance to look beyond the next component change. Consider the journeys you want to make regularly, how often you’ll use the bike and whether you’d rather adapt your current setup or choose a bike built for your plans. That wider view can make your next step clearer.
If you’re considering a different bike, The Cycle Centre offers Bike to Work, Cycle to Work and Ride to Work. These schemes may help you plan your purchase. Think about the riding you want to do, then choose an option that suits your everyday cycling and future adventures.
For a considered next step, contact The Cycle Centre for advice. A clearer idea of your routes and priorities will help you have a useful conversation and move towards more confident rides.
Frequently Asked Questions
Does tire profile help?
Yes, tread can improve grip on loose gravel, but it won’t overcome limited clearance or unsuitable brakes. For paved sections and firm tracks, a less aggressive tread may feel more appropriate than a heavily knobbled tyre. If your routes include loose stones or rough paths, a more pronounced tread can offer extra traction. Match the pattern to your usual terrain and test it on familiar surfaces.
Can you convert a road bike to a gravel bike?
Yes, converting a road bike to a gravel bike can work on hardpack and manageable gravel, provided the frame and components suit the route. Start with a short ride on firm ground, then try a gravel path and assess the steering and braking. A converted bike retains its original frame geometry and design limits, so it may not suit rough trails or demanding off-road riding.
What tyre width can my road bike frame and fork fit?
The maximum depends on the tightest point at the fork, frame or brakes, rather than the tyre label alone. Measure around the mounted wheel, including the chainstays, and leave about 5 mm on either side there. Check both wheels, since clearance may differ between front and rear. Also allow for the tyre becoming wider on a wider rim, and make sure it spins without rubbing.
Which gravel tyres work best for road bikes on mixed surfaces?
For mixed paved and gravel routes, choose a tyre that balances road rolling with grip on loose sections. A less aggressive tread suits smoother routes, while a more pronounced pattern can help on rougher gravel. Consider a puncture-resistant casing if your rides include stony tracks. Frame clearance determines the usable width, so choose a tread and size that both fit rather than selecting by appearance alone.
Can you fit gravel handlebars or flared drop bars to a road bike?
Usually, if the handlebar matches the stem and your brake levers and shifters fit it. Before changing bars, compare their width and shape with your current cockpit, and consider how the new position affects reach. Flat bars and drop bars use different control arrangements, so don’t assume your existing controls will transfer directly. After fitting, check steering and brake access on a quiet route.
What are the risks and limitations of riding a converted road bike on gravel?
The main constraints are tyre clearance, braking, gearing and road-bike geometry. A close-fitting tyre can rub, and a rim-brake frame cannot be converted to disc brakes. A road derailleur may also limit cassette choice, making steep gravel climbs harder. Start on hardpack, test braking and handling, and progress to rougher paths only if the bike remains controlled. A converted road bike isn’t a substitute for a purpose-built bike on demanding trails.
How much does a gravel bike cost compared with converting a road bike?
A complete gravel bike costs more upfront than reusing compatible road-bike parts. Extensive component changes can reduce that difference.
What parts do I need to convert a road bike to a gravel bike, and how much do they cost in Ireland?
Common parts include tyres and tubes or tubeless equipment, and possibly wheels or drivetrain components. In Ireland, the cost depends on what fits your bike and which parts you replace.