


Pumping your gravel tyres rock-hard to gain speed is actually slowing you down. While rock-solid rubber feels rapid on fresh tarmac, it actively robs your momentum over washboard tracks, punishing your body with vibration fatigue and triggering terrifying front-wheel washouts on loose corners. If you have spent rides bouncing uncontrollably over rough bridleways or dreading unexpected pinch flats, you are not alone; finding the sweet spot across mixed terrain is an ongoing challenge. That is why this practical gravel bike tyre pressure guide strips away the guesswork to help you dial in the ideal setup.
You will discover how lower pressures actually roll faster off-road by absorbing trail chatter rather than deflecting your forward momentum. We will help you calculate an exact, personalised baseline pressure tailored to your body weight and tyre width, whilst showing you how to run tubeless tyres safely without risking rim strikes or tyre roll-off. Here is your roadmap to adapting pressures confidently whether you are linking smooth tarmac, rocky trails, or slick mud.
Key Takeaways
- Understand why lower pressures absorb rough surface impedance rather than deflecting momentum, directly increasing rolling speed off-road.
- Calculate your ideal starting PSI using this gravel bike tyre pressure guide to balance total system weight across widths from 38mm to 50mm.
- Discover the optimal front-to-rear pressure distribution to ensure confident cornering grip without risking tyre burping or rim damage.
- Adapt your tyre pressure systematically using a four-step framework when routes transition between slick mud, loose rock, and fast tarmac.
- Implement a reliable five-kilometre testing protocol with a digital gauge to identify your personal pressure sweet spot across mixed terrain.
Why Gravel Bike Tyre Pressure Matters More Than Any Other Upgrade
Riders often spend thousands chasing carbon wheels or lightweight drivetrains, yet overlook the two contact patches connecting them to the earth. Finding your optimal tyre pressure delivers a far greater performance leap than any high-end component. It establishes the critical balance between mechanical grip and casing stability, ensuring the tyre remains supple enough to mould over trail obstacles without squirming or rolling off the rim under hard cornering loads.
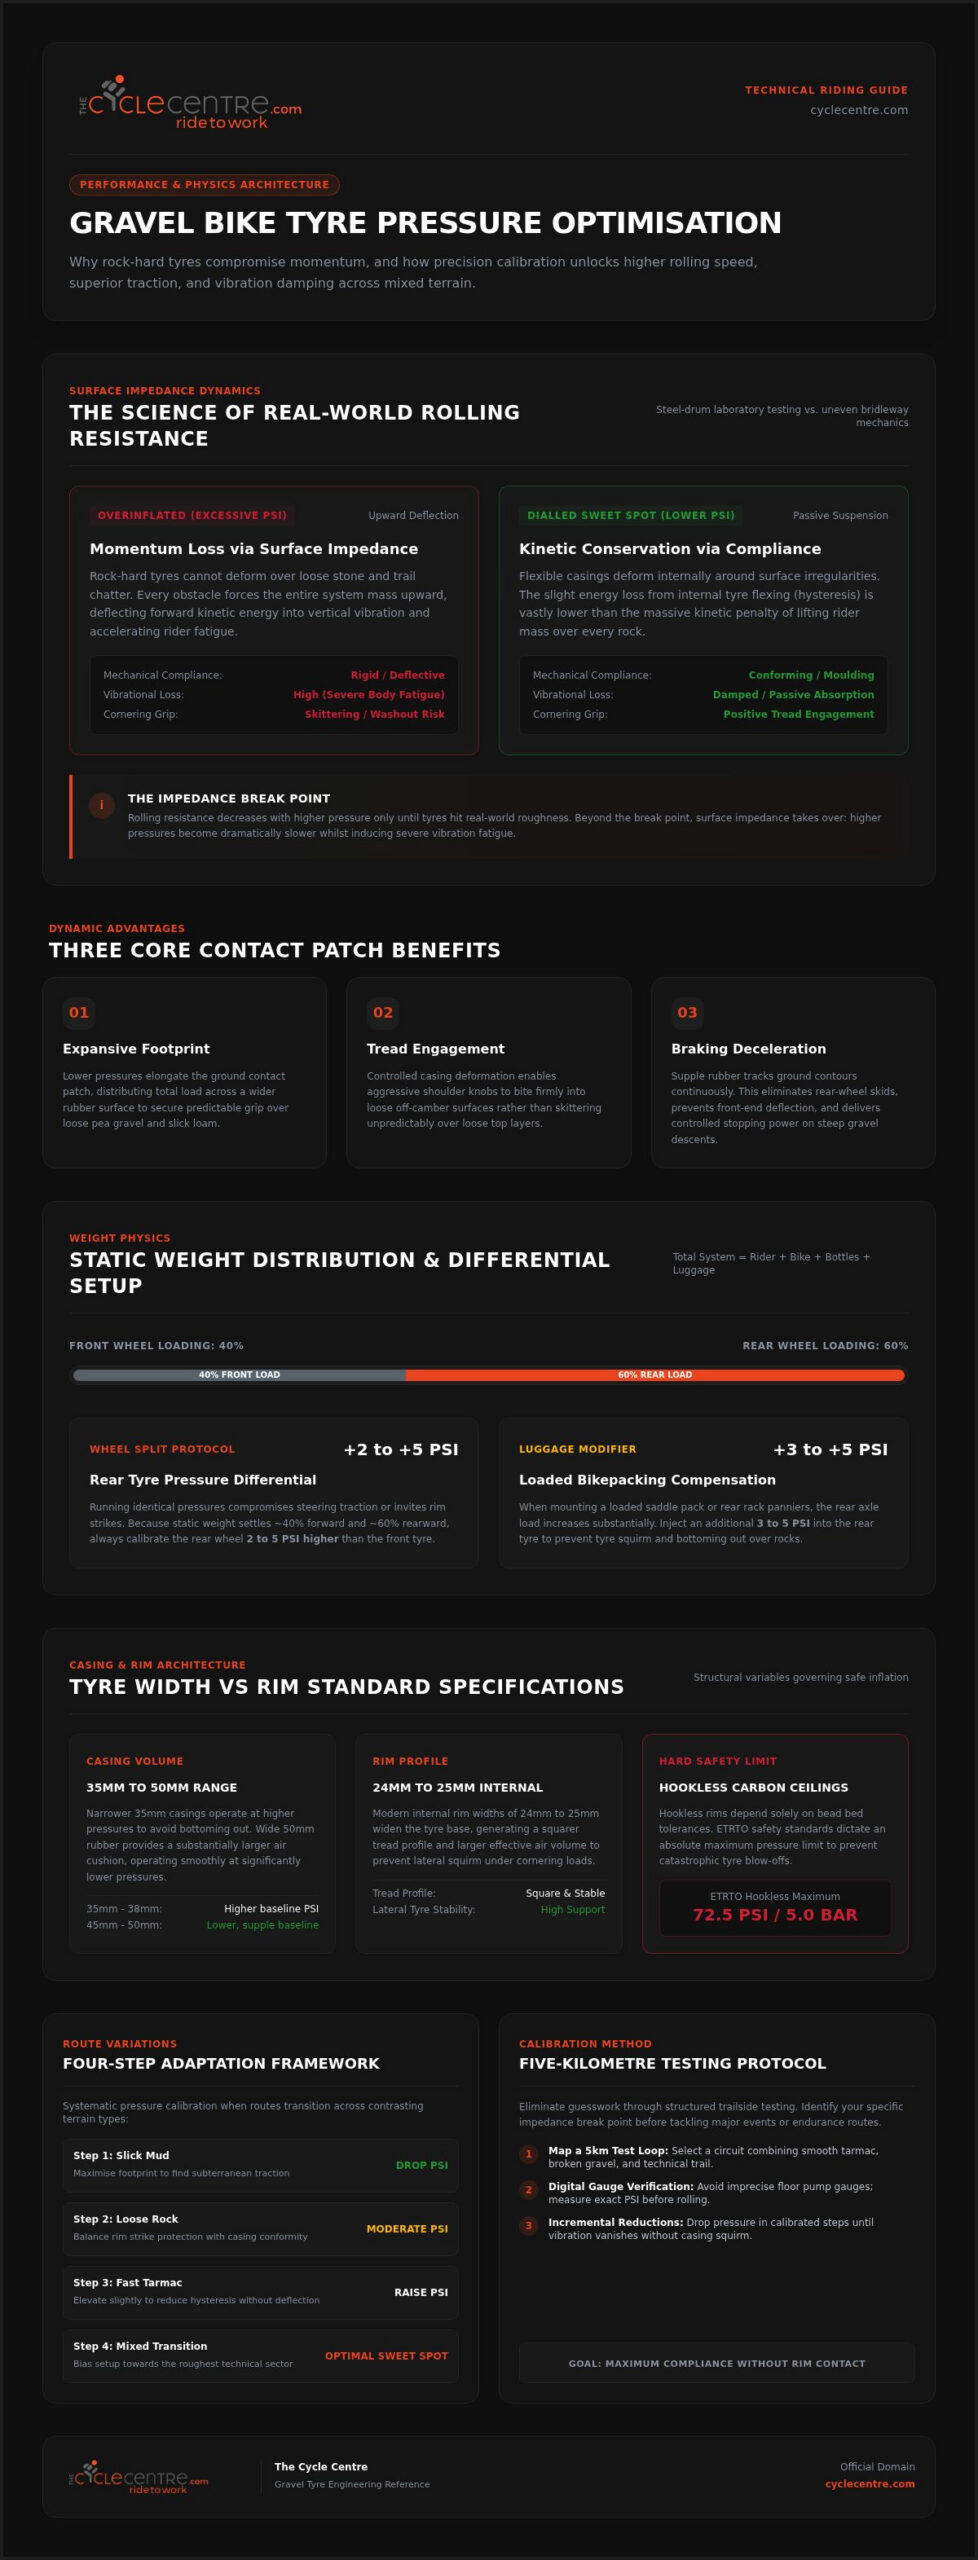
Traditional cycling wisdom relied heavily on steel-drum laboratory tests. These tests consistently showed that higher pressure reduced rolling resistance because steel drums are perfectly smooth. In the real world, rough gravel behaves entirely differently. When a tyre hits broken ground, surface impedance takes over. If the tyre is rock-hard, it cannot deform; instead, it bounces upward off every loose stone. That upward deflection forces your body mass to lift repeatedly, robbing forward kinetic energy and causing punishing upper-body fatigue. Modern engineering consensus proves that supple tyres conforming over road chatter conserve forward momentum, keeping you faster and fresher over long distances.
The Science of Rolling Resistance and Surface Impedance
To master your setup using this gravel bike tyre pressure guide, you must understand the “impedance break point.” Below this pressure threshold, tyres absorb minor surface irregularities through internal casing deflection. Although rubber flexing generates minimal internal energy loss (hysteresis), it is vastly smaller than the massive vibrational losses caused when an overinflated wheel deflects your entire body weight upward. A deeper look into bicycle tire construction reveals that flexible casings act as passive suspension systems. They eliminate harsh vibrations and allow you to sustain higher power outputs without fighting the bike.
Traction, Braking Control, and Cornering Confidence
Tuning your pressure directly dictates the tyre footprint. As pressure drops to its sweet spot, several handling advantages emerge:
- Expansive contact patch: Lower pressures elongate the footprint, spreading your weight across more rubber to generate dependable grip over loose pea gravel and slick loam.
- Aggressive tread engagement: Controlled casing deformation allows shoulder knobs to bite firmly into corners rather than skittering unpredictably over loose top layers.
- Shorter braking distances: Tyres that track ground contours remain in continuous contact with the trail, preventing rear-wheel skids and boosting front-end braking stability on steep descents.
Dialling in your tyres transforms how your gravel bike performs. It eliminates trail chatter, builds cornering confidence, and ensures every pedal stroke drives you forward.
Key Factors Determining Your Ideal Gravel Tyre Pressure
Rigid pressure charts rarely tell the full story. Dialling in your setup requires looking at the bike and rider as an integrated system rather than applying arbitrary numbers printed on rubber sidewalls. Several dynamic variables dictate how your tyres behave once rubber hits rough terrain.
Total System Weight and Front-to-Rear Distribution
Your baseline inflation must reflect total system weight. This calculation combines your body weight, your gravel bike, full water bottles, tools, and any bikepacking luggage. In cycling physics, static weight distribution sits roughly at 40% over the front wheel and 60% over the rear. Consequently, running identical pressures across both wheels compromises either traction or rim protection. Keep the rear tyre 2 to 5 PSI higher than the front. If you attach a loaded saddle bag or rack panniers, add an extra 3 to 5 PSI to the rear to compensate for the shifted mass.
Tyre Width, Internal Rim Geometry, and Hookless Profiles
Tyre volume fundamentally alters inflation requirements. A narrow 35mm all-road casing requires higher pressure to prevent bottoming out, whilst a high-volume 50mm tyre provides a naturally larger air cushion at much lower pressures. Rim design also transforms tyre behaviour:
- Internal rim width: Modern internal widths of 24mm to 25mm widen the tyre base, creating a squarer tread profile and increasing air volume so you can run lower operating pressures without squirming.
- Hookless rim limits: Hookless carbon rims rely on tight tolerances rather than a bead hook. ETRTO safety standards dictate an absolute maximum ceiling of 72.5 PSI (5 BAR) for hookless rims to prevent catastrophic blow-offs, whereas hooked tubeless systems safely handle up to 100 PSI (6.9 BAR).
If you are unsure whether your current rim and tyre combination complies with these safety standards, our mechanics can inspect your setup during a Workshop Silver Service.
Inner Tubes vs Tubeless Systems vs Tyre Inserts
Your internal wheel setup is the final deciding factor in this gravel bike tyre pressure guide. Traditional inner tubes rely on higher pressures to prevent snakebite punctures, which happen when an impact pinches the rubber tube against the metal rim wall. Switching to a tubeless arrangement eliminates this risk entirely, safely unlocking pressures 5 to 10 PSI lower for superior traction.
For aggressive riding over jagged trails, gravel-specific foam tyre inserts offer added security. These inserts cushion the rim flange against violent impacts, allowing you to run low pressures on rocky tracks without rim damage or tyre burping.
Gravel Bike Tyre Pressure Baseline Chart: Starting PSI by Weight
Every reliable gravel bike tyre pressure guide needs a practical starting benchmark. While individual terrain and riding styles inevitably require fine-tuning, the baseline figures below give you a dependable reference point. Most gravel setups operate between 25 and 45 PSI, scaled around rider mass and casing volume.
The baseline recommendations below reflect modern tubeless setups mounted to 23mm to 25mm internal rims for mixed gravel and tarmac. A proven industry guideline is to adjust your pressure by roughly 1 PSI for every 4.5 kg (10 lbs) of rider weight change from a baseline:
- 60 kg Rider:
- 700x38c: 31 PSI Front / 33 PSI Rear
- 700x42c: 27 PSI Front / 29 PSI Rear
- 700x45c: 24 PSI Front / 26 PSI Rear
- 650bx47mm: 22 PSI Front / 24 PSI Rear
- 75 kg Rider:
- 700x38c: 35 PSI Front / 38 PSI Rear
- 700x42c: 31 PSI Front / 33 PSI Rear
- 700x45c: 27 PSI Front / 30 PSI Rear
- 650bx47mm: 25 PSI Front / 27 PSI Rear
- 90 kg Rider:
- 700x38c: 40 PSI Front / 43 PSI Rear
- 700x42c: 35 PSI Front / 38 PSI Rear
- 700x45c: 32 PSI Front / 35 PSI Rear
- 650bx47mm: 29 PSI Front / 32 PSI Rear
If you run inner tubes, add 5 to 10 PSI across all these values to guard against sudden pinch flats over square-edged potholes.
700C Wheel Pressure Starting Recommendations
Narrower 700c tyres require precise inflation window management. For 38c rubber ridden across fast hardpack trails, higher pressures preserve casing stability during hard out-of-the-saddle efforts. Moving up to 42c or 45c mixed-terrain tyres expands air volume considerably. That extra chamber allows you to drop pressures into the upper-twenties without rim squirm, running the front wheel 2 to 3 PSI below the rear for agile, predictable steering.
650B High-Volume Adventure Pressure Settings
Dropping rim diameter to 650b unlocks voluminous 47mm to 50mm casings that function like miniature pneumatic suspension springs. For a 60 kg rider, pressures regularly drop down near 22 PSI, yielding unmatched floatation across loose sand, washed-out riverbeds, and wet roots. Always verify frame and fork clearance before swapping to high-volume tyres, ensuring mud cannot clog the chainstays and abrade your paint.
How to Adjust Gravel Tyre Pressure for Different Surfaces and Weather
A static baseline only gets you to the trailhead. Real-world riding demands dynamic adjustments because conditions evolve beneath your wheels. To get the most from this gravel bike tyre pressure guide, apply a practical four-step calibration before rolling out:
- Route composition: Gauge the ratio of smooth tarmac to unpaved trail.
- Surface roughness: Determine whether the dirt consists of packed dust, loose gravel, or jagged rock.
- Moisture levels: Check for slick mud, standing puddles, or greasy tree roots.
- Ambient temperature: Account for seasonal shifts. Tyre pressure drops by roughly 2% for every 5.5°C (10°F) drop in temperature, meaning a warm garage reading can drop significantly on frosty winter lanes.
Hardpack and Mixed Road-to-Trail Routes
Mixed routes combining 50% asphalt with 50% hardpacked towpaths require restraint. Resist the urge to pump tyres to their upper limits for road sectors. Overinflating may deliver a fleeting sense of speed on smooth tarmac, but it causes tyres to bounce skittishly the instant you hit gravel, degrading cornering control. Setting tyres 2 to 3 PSI above your baseline strikes the right compromise, ensuring efficient rolling without prematurely wearing the centre tread.
Chunky Flint, Loose Rocks, and Mountain Bike Singletrack
Riding rough, rocky trails requires careful pressure management. Go too high, and the bike deflects off jagged flint; drop too low, and you risk pinching a casing or cracking a rim. If your tyres feel squirmy or fold laterally in berms, you have dropped below the safe threshold. Adding foam tyre inserts solves this dilemma, safeguarding rims against violent impacts whilst letting you run pressures 2 to 3 PSI lower for exceptional grip.
Wet Mud, Slick Roots, and Winter Gravel Conditions
When autumn rains saturate trails, lower your baseline pressure by 2 to 4 PSI. Dropping pressure spreads the contact patch across wet, off-camber roots and helps the casing flex, actively shedding sticky mud from the tread blocks rather than letting it pack solid.
Upgrading your machine for challenging terrain is easier than you think. You can acquire high-performance gravel and adventure bikes, premium wheels, and weatherproof gear through the Cycle to Work scheme Ireland. Browse our selection of rugged gravel bikes and bike components at The Cycle Centre to equip yourself for year-round exploration.
Essential Tools, Testing Protocols, and Trailside Troubleshooting
Dialling in your setup using this gravel bike tyre pressure guide requires accurate instrumentation. Squeezing rubber with your thumb gives zero actionable data; human fingers cannot distinguish between 26 and 32 PSI, yet that exact difference fundamentally alters your bike’s handling on loose surfaces.
Accurate Tyre Pressure Gauges vs Standard Floor Pumps
Most standard track pumps feature large analogue dial gauges engineered to measure road pressures up to 160 PSI. At lower gravel operating ranges, these needles often suffer a 3 to 4 PSI calibration discrepancy. On a 30 PSI gravel setup, a 3 PSI variance represents a massive 10% error margin. Investing in a standalone digital pressure gauge provides precise 0.5 PSI readouts, giving you repeatable data ride after ride. For trailside repairs, pack a compact mini-pump equipped with an in-line digital gauge to make measured top-ups rather than rough guesses.
The Step-by-Step Field Testing Protocol
Finding your personal sweet spot requires a short, methodical testing session:
- Select a representative loop: Map out a 3 to 5-kilometre circuit containing smooth tarmac, washboard gravel, and several off-camber corners.
- Start high: Inflate your tyres to the top end of the baseline chart for your weight and tyre width.
- Drop in increments: Complete a lap, note handling feedback, and release 1 to 2 PSI from both tyres using a digital gauge bleeder valve.
- Find the limit: Continue testing until you sense tyre wallow or feel the casing touch the rim on sharp compressions. Once that occurs, add back 2 PSI to establish your ideal baseline.
Diagnosing Common Pressure Symptoms and Expert Workshop Care
Paying close attention to how your bike behaves on mixed terrain tells you exactly what adjustments to make:
- Underinflation warnings: If your wheels squirm laterally in berms, make audible clacking noises against sharp obstacles, or burp sealant under heavy braking, your pressure is too low.
- Overinflation warnings: When your handlebars vibrate violently, climbing tyres slip over loose pea gravel, or the bike deflects skittishly offline, bleed off excess air.
If persistent pressure loss, rim damage, or bead-seating issues continue to plague your rides, schedule an inspection with the certified mechanics at The Cycle Centre. Our technicians handle tubeless conversions, rim-tape renewals, and complete wheel alignments through our dedicated Workshop Silver Service and Gold Service packages, keeping your gravel rig running smoothly across every route.
Take Control of Your Gravel Ride Today
Unlocking off-road performance does not require an expensive overhaul. Dialling in the perfect tyre pressure delivers immediate improvements in mechanical grip, vibration dampening, and real-world speed. By using this gravel bike tyre pressure guide to calculate your personalised baseline and adapting your setup to shifting trail conditions, you transform punishing washboard tracks into fast, flowing adventures.
Whether you want to fine-tune your tubeless setup or upgrade your gravel machine, experienced support makes all the difference. Established in 1974, The Cycle Centre is an independent, family-run specialist supporting riders across Ireland. As an authorised retailer of leading brands including Giant and Cube, our Shimano accredited workshop technicians provide the precision care your bike deserves. Ready to master your setup? Explore gravel bikes and workshop servicing at The Cycle Centre and head out on your next trail with complete confidence.
Frequently Asked Questions
How much tyre pressure should I run in my gravel bike tyres?
Most gravel riders should operate between 25 and 45 PSI, depending on their total system weight, tyre width, and terrain. A 75 kg rider running 700x42c tubeless tyres typically starts around 31 PSI in the front and 33 PSI in the rear. Follow a tailored gravel bike tyre pressure guide to establish your specific baseline, adding 5 to 10 PSI if your wheels use traditional inner tubes.
Can I run the tyre pressure indicated on the sidewall of my gravel tyre?
No, you should never inflate your tyres to the maximum PSI moulded onto the rubber sidewall. That figure represents the absolute blowout safety limit for the casing, not an optimal operating recommendation. Inflating to that maximum produces a harsh ride and severely compromises off-road traction. Furthermore, that number often exceeds the 72.5 PSI (5 BAR) safety limit set for modern hookless rims.
Is lower tyre pressure faster on gravel roads?
Yes, lower tyre pressures are demonstrably faster over rough surfaces because they minimise vibrational energy losses. When an overinflated tyre strikes loose stone, it deflects upward, bouncing your body mass and wasting forward kinetic momentum. A supple, moderately inflated tyre deforms over surface chatter instead. This mechanical compliance smooths out trail imperfections and allows your bike to maintain speed efficiently across mixed off-road sectors.
What happens if your gravel bike tyre pressure is too low?
Running insufficient pressure causes tyre squirm, where the rubber casing folds laterally during aggressive cornering. You also risk violent rim strikes against rocks, which can crack carbon rims or dent aluminium wheel flanges. On tubeless setups, extreme underinflation causes tyre burping, releasing bursts of air and sealant during hard cornering loads. If you use inner tubes, inadequate pressure leads directly to pinch flats.
How much lower can I run tyre pressure with a tubeless gravel setup?
Tubeless setups allow you to run roughly 5 to 10 PSI lower than an identical tyre containing an inner tube. Without a delicate tube trapped against the rim flange, the risk of snakebite punctures disappears entirely. This significant pressure reduction broadens your contact patch, noticeably increases braking traction on loose descents, and dampens relentless gravel trail buzz without compromising casing safety.
How often should I check my gravel bike tyre pressure?
You should check your tyre pressure before every single ride using a dedicated digital gauge. Gravel tyres hold significantly less air volume than mountain bike rubber, meaning even a 2 PSI drop changes your bike’s handling balance by nearly 10%. Relying on a quick thumb squeeze cannot identify minor pressure drops that lead to rim strikes or vague handling through technical corners.
Why does my gravel tyre lose pressure over several days?
Gradual pressure loss is normal on gravel setups, particularly with tubeless systems. Air slowly migrates through microscopic pores in lightweight tyre casings or around valve stems. Tubeless sealant naturally dries up over two to four months, reducing its airtight seal. If your tyre loses more than 3 to 5 PSI overnight, check for loose valve cores, pierced rim tape, or depleted sealant levels.
Does cold winter weather affect gravel bike tyre pressure?
Cold weather directly reduces internal tyre pressure due to basic thermodynamic laws. As ambient temperatures fall, the air molecules inside your tyre contract, dropping internal pressure by approximately 2% for every 5.5°C decrease. If you pump your tyres inside a heated 20°C workshop before heading into 3°C winter drizzle, your tyres will drop around 2 PSI. Always account for outdoor temperatures when referencing your gravel bike tyre pressure guide.